
Enrolling and using Token2 USB Security keys with ESET Secure Authentication
ESET Secure Authentication (ESA) adds two-factor Authentication (2FA) to Microsoft Active Directory domains or local area networks,meaning a one-time password (OTP) is generated and provided along with the generally required username and password.
There are two main approaches to OTP: TOTP and HOTP. Event-based OTP (HOTP)—expires when used or when generating a new OTP.
The Token2 security keys can be used as simple HOTP tokens and work in keyboard emulation mode. Once the HOTP secret is recorded on the device, by touching the button/sensor on the key for a couple of seconds, you initiate the OTP generation, which is automatically sent to the host system via USB as if it were entered by a keyboard (hence it is called “emulation). In this guide, we will show the procedures required to enroll and use Token2 security keys (Important: Only models with the HOTP feature are compatible for use) to log in to your server protected with ESA via RDP.
HOTP is the only method that will work with ESA for offline login.
Preparing an XML file with HOTP records.
First of all, you need to prepare a XML file with HOTP records in PSKC format (the Portable Symmetric Key Container (PSKC) format is used to transport and provision symmetric keys to cryptographic devices or software).You can add several HOTP records to one file and import the file at once by adding new to <KeyPackage></KeyPackage> values. Or make separate XML files for every HOTP record.
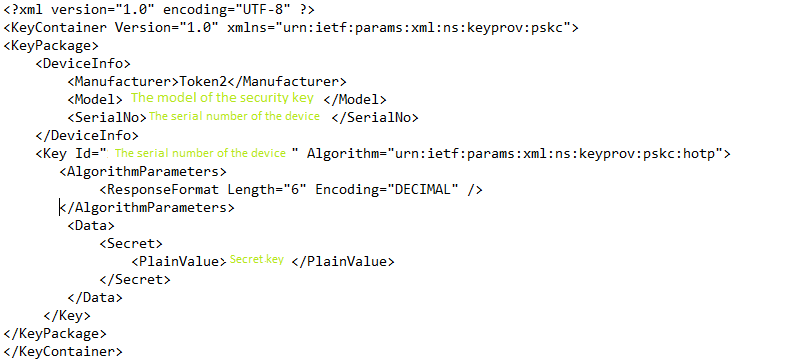
The SerialNo and Key Id values are used to identify the intended hardware, and theoretically, you can use any value, but be sure it is different for every HOTP record.
To make it easier to identify the desired device in the list of hard tokens, you can give a friendly name instead of serial number.
Depending on the model , there are two different tools to create the HOTP profile in the Token2 USB Security keys: T2 HOTP tool and Companion app.
After creating a HOTP profile, we need to add the newly generated secret key between <PlainValue> and </PlainValue>.
Please note that the secret key (seed) should be in base32 format only. If you need to convert a hex seed to base32 format, you can use our hosted TOTP Toolset.
Create a HOTP profile with otp-cli.exe tool
1) Download the tool from here. For non-Windows platforms, there is a python version of the same tool in the customer area (an account is needed).2) Insert the Token Security key. The tool will identify the inserted device.
4) Generate a random secret key and issue the command below:
otp-cli.exe set_btn_seed --code-length 6 --seed ABCABCAA --short-touchHere, ABCABCAA is an example of a base32 seed. Make sure to replace this with a random value. Use the methods below to generate random seeds:
# Generate a random 32-byte array
$randomBytes = New-Object byte[] 20
(New-Object System.Security.Cryptography.RNGCryptoServiceProvider).GetBytes($randomBytes)

# Convert the byte array to a Base32 string
$base32Alphabet = "ABCDEFGHIJKLMNOPQRSTUVWXYZ234567"
$base32String = ""
for ($i = 0; $i -lt $randomBytes.Length; $i += 5) {
    $chunk = [bitconverter]::ToUInt32($randomBytes[$i..($i+4)] + (0..(4 - ($randomBytes.Length - $i) % 5)))
    $base32String += ($base32Alphabet[$chunk -shl 3 -shr 27] + $base32Alphabet[($chunk -shl 8 -shr 27) -bor (($chunk -shl 3 -shr 24) -shr 5)] +
        $base32Alphabet[($chunk -shl 13 -shr 27) -bor (($chunk -shl 8 -shr 24) -shr 5)] + $base32Alphabet[($chunk -shl 18 -shr 27) -bor (($chunk -shl 13 -shr 24) -shr 5)] +
        $base32Alphabet[($chunk -shl 23 -shr 27) -bor (($chunk -shl 18 -shr 24) -shr 5)] + $base32Alphabet[($chunk -shl 28 -shr 27) -bor (($chunk -shl 23 -shr 24) -shr 5)])
}
$base32String = $base32String.Substring(0, 32)
Write-Output $base32String
Enable and Import Hard Tokens
1. In the ESA Web Console, click Hard Tokens.2. Select the Enabled checkbox if it has not been selected by default.
3. Click the "Import Hard Tokens button".
4. Select the XML file.
5. Click the "Import tokens" button.
6. A result notification will pop up indicating how many hard tokens were imported, and the imported hard tokens will be displayed.

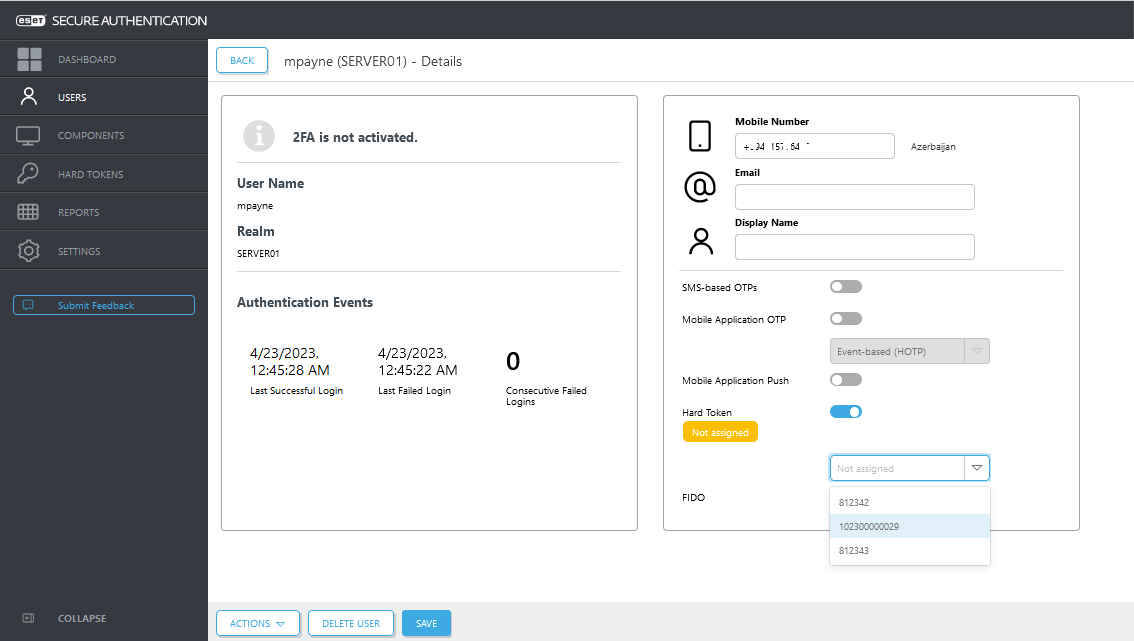
Assign Hard Token to a user
1. In the ESA Web Console, click Users.2. Click the name of the appropriate user.
3. Click the toggle next to Hard Token and select a hard token from the list.
4. Click Save.
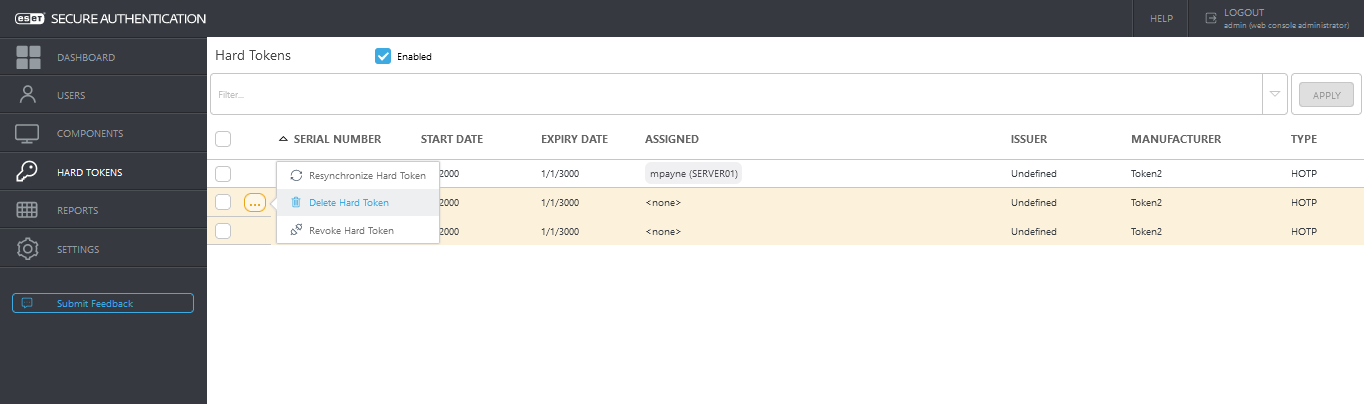
Delete Hard Tokens
1. In the ESA Web Console, click Hard Tokens.2. Select the appropriate tokens and click Delete.
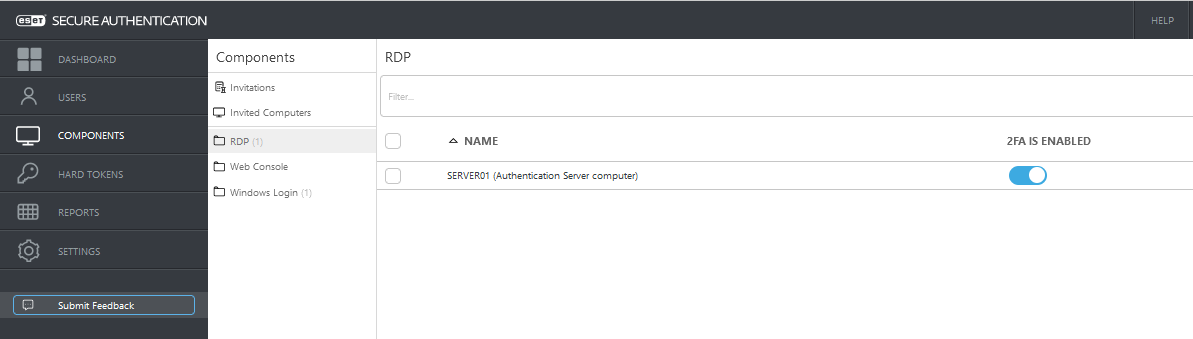
Logging in using a Token2 Security key
1. In the ESA Web Console, click Components.2. Select RDP, and on the right panel, enable 2FA option.
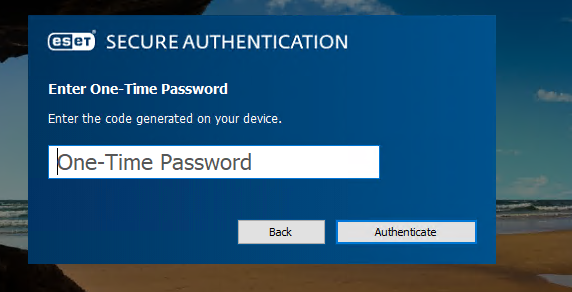
3. Use Remote Desktop Connection to connect to your server with an enrolled user. After entering you login and password, you will be prompted to enter OTP.
Plug in your Token2 Security key and click the button on it. The device will generate an OTP, which is automatically sent to ESA, and you will be able to successfully login.
ESET Secure Authentication
Subscribe to our mailing list
Want to keep up-to-date with the latest Token2 news, projects and events? Join our mailing list!