
Using Token2 FIDO2 Security keys for Remote Desktop
Windows supports remote connections to devices joined to Active Directory as well as devices joined to Microsoft Entra ID using Remote Desktop Protocol (RDP). Now, with the new RDPAAD protocol and the inclusion of a “web account” selector in the Microsoft RDP client, it is also possible to use FIDO2 to authenticate the RDP session itself.In this guide, we’ll walk you through the process of configuring RDP for FIDO2 authentication with Token2 security keys.
Requirements:
• The remote host is either Windows 10, Windows 11 or Windows Server 2022, again with all the relevant updates.• The remote host must be AAD Joined / Hybrid AAD Joined.
• The remote host must be accessible over NETBIOS or FQDN.
• A Token2 FIDO security key.
Add your user as a Remote Desktop user
1. Press the Windows key on the target host and start typing “PowerShell” and then select PowerShell from the filtered list.
2. Enter the following command (modify the UPN as applicable): Add-LocalGroupMember -Group "Remote Desktop Users" -Member "AzureAD\[email protected]" and then press ‘Enter’.
3. Close PowerShell.
Note.When a Microsoft Entra group is added to the Remote Desktop Users group on a Windows device, it isn't honored when the user that belongs to the Microsoft Entra group logs in through RDP, resulting in a failure to establish the remote connection. In this scenario, Network Level Authentication should be disabled to allow the connection.
Enable security key sign-in
To enable security key sign-in using Group Policy, you can follow these steps:- Press the Windows key and type gpedit.
- Right-click on the result and choose "Run as administrator."
- When prompted to run the app in elevated mode, select "Yes."
- Go to Computer Configuration > Administrative Templates > System > Logon.
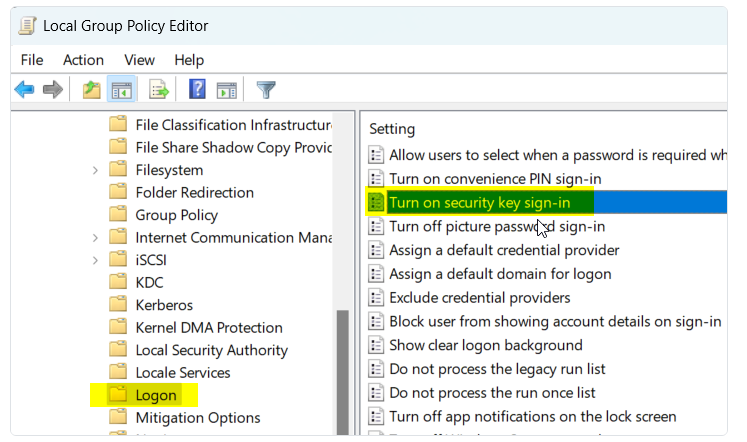
- Double-click on "Turn on security key sign-in" and choose "Enabled." Then click "OK."
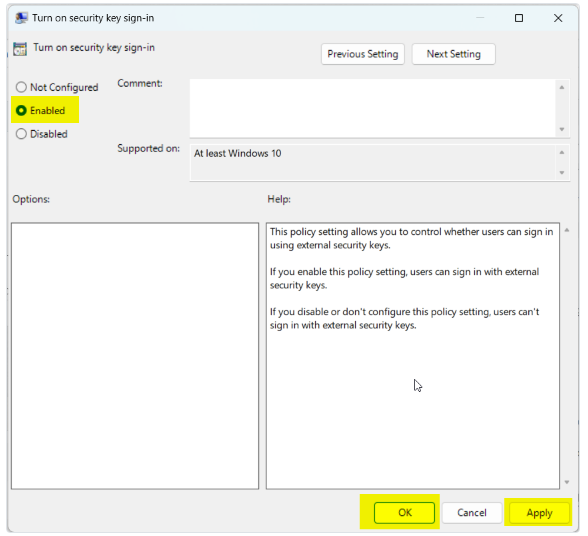
- Close the Group Policy Editor and restart your computer to apply the changes.
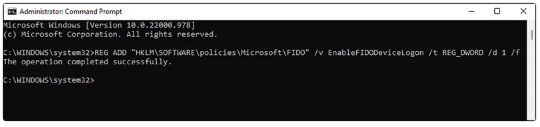
The same operation can be achieved using the command below:
REG ADD "HKLM\SOFTWARE\policies\Microsoft\FIDO" /v EnableFIDODeviceLogon /t REG_DWORD /d 1 /f
Requiring MFA and controlling the Session with Conditional Access
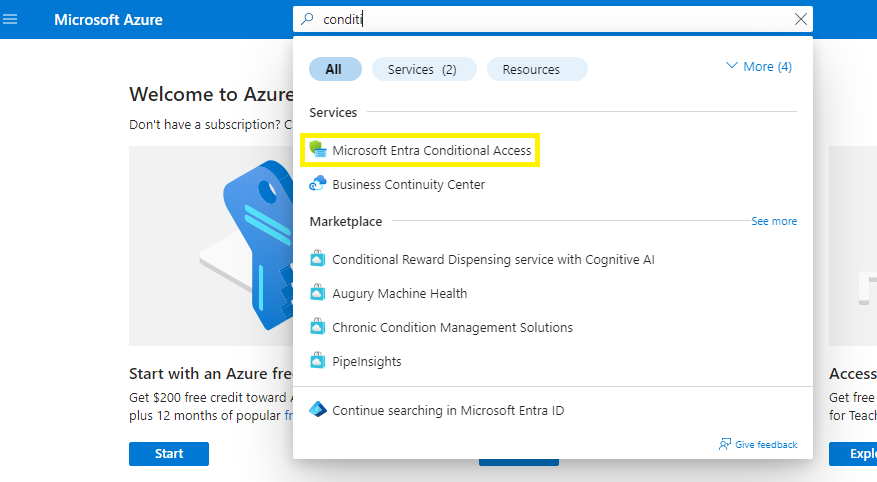
1) Open a browser and navigate to the Azure portal(https://portal.azure.com).2) In the search bar, type “conditional access” and click on Microsoft Entra Conditional Access.
3) Within the Conditional Access feature, click "New policy" (top)
4) Give the policy a meaningful name, e.g. “Require security key for RDP”
5) Click on the link "Specific users included" under the Users menu and select option "Select users and groups". Add users to this policy.
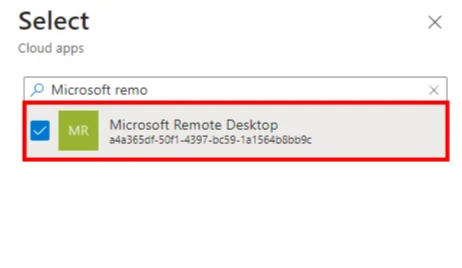
6) Next, click the link under ‘Target resources’ and select Cloud apps from the dropdown menu, followed by selecting (radio button) select apps and then click ‘Select apps ’ and choose Microsoft Remote Desktop with Ida3a365df-50f1-4397-bc59-1a1564b8bb9c from the list and click Select.
7) Click the link under ‘Grant’, choose the 'Require authentication strength' option, and select 'Phishing-resistant MFA' from the drop-down menu.

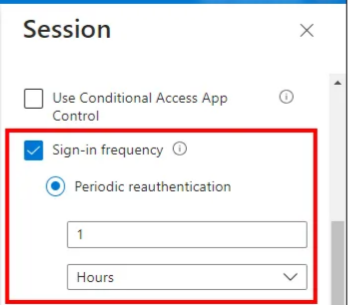
8) Finally, click ‘Session’ and then select Sign-in frequency in the configuration blade right hand side and select an appropriate session life, e.g.: 1 hours followed by clicking Select.
9) Now click ON in the ‘Enable policy’ toggled (bottom) and then Create.
Create and authenticate an RDP session
1) On your Windows 10/11 client, press the Windows key and start typing “RDP” or “MSTSC” and then select Remote Desktop Connection from the filtered list.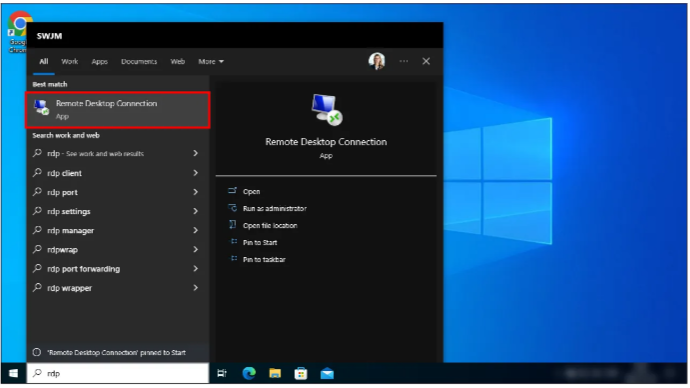
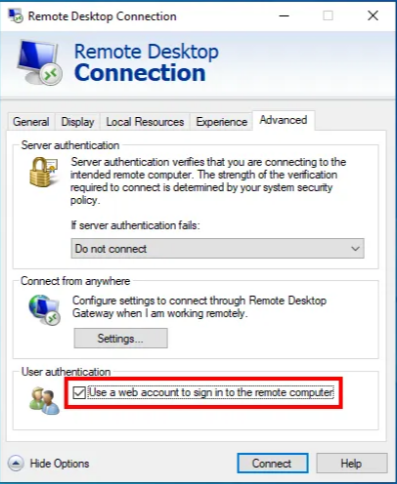
2) Click to select the ‘Advanced’ tab (right hand side).
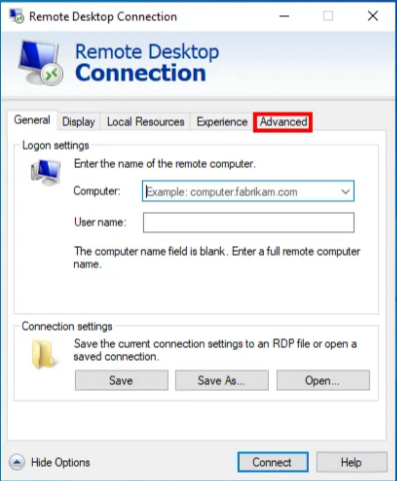
3) In the ‘Advanced’ view, under ‘User authentication’ check the box "Use a web account to sign in to the remote computer".
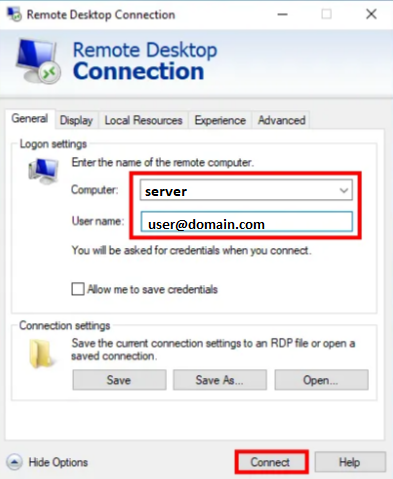
4) Click to select the ‘General’ tab (left hand side).
5) Provide the target host name (NETBIOS/FQDN) and username (UPN), then click Connect.
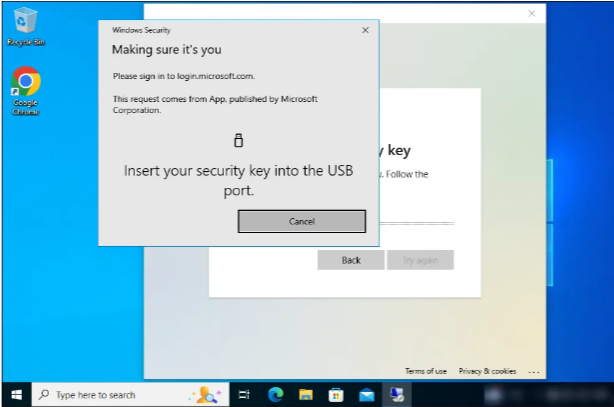
6) In the browser window, select or input the account name.
7) Insert your FIDO2 security key (if not already present).
8) Provide a PIN and click OK.
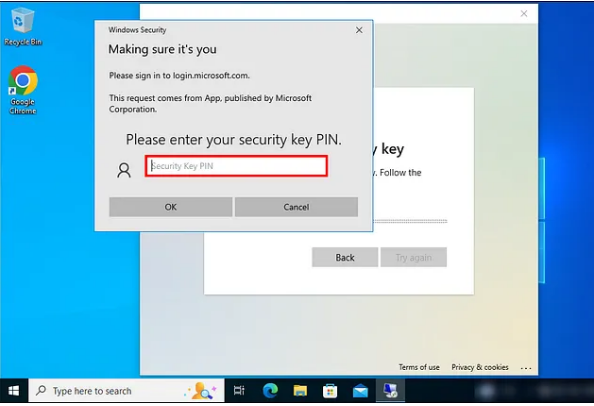
9) Touch the security key.
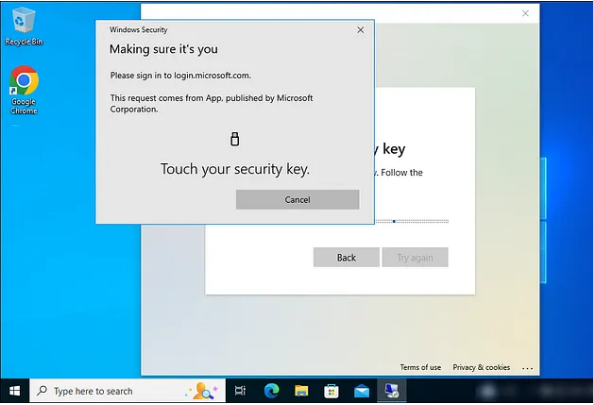
You will be able to successfully log in.
Please note that Azure AD (Microsoft Entra ID) Join supports Windows 10 and Windows 11, but Windows Server operating systems are not supported. For Windows Server systems, they must be running as a virtual machine in Azure in order to become a part of Azure AD (Microsoft Entra ID).
Subscribe to our mailing list
Want to keep up-to-date with the latest Token2 news, projects and events? Join our mailing list!